Tuesday, August 31, 2010

Aluminum cleaning and start Bodywork

[Post editing note: After doing this work several months ago and posting this days' work, I was kindly informed by a fellow Porsche enthusiast that the body panels for the 944 are all STEEL. Oops! Adjust accordingly.]


I started the day out buying a metal file from the hardware store. Try as I might to clean up yesterdays HTS "welds", nothing has worked. If I try to scrape them flush with Triangle Scraper, they pop out or get messed up. Sandpaper just isn't enough. So I bough a small metal-file set, and took off the handles and slowly filed each of the big jagged "welds" until they were perfectly flush with the car. It took 1.5 hours, but I was really pleased with the results.

Next I started to pull off the tape that had been used to keep paint stripper out of all the grooves and seams of the car. The tape in most places had soaked up stripper which had been working on the paint under the tape. I pulled tape of the whole driver's side, and scraped off any paint underneath with the Triangle Scraper. Once again this was the perfect tool since I could place the pointy part of the triangle down into the seam (on the side of the hood for example) and it would scrape a nice even line of paint off the edge of the panel. I will not be removing paint off the jambs and hood interior, since they have original paint, no Maaco paint, and no rust or sun damage and should provide a good base for the new primer and paint. I spent 3 hours pulling tape and scraping paint from all panels edges on the driver's side.

After way too much paint stripping, the car is finally all bare metal. (except for the passenger side seams which I'll get to tomorrow) Unfortunately, it has taken days and days, which means the bare aluminum has just sat exposed to the air, and has started to oxidize. To be honest. The metal looked pretty mottled as the paint was coming off, and it still looks pretty dark and mottled, so I can't see well how much it has oxidized. But, the paint shop, and every book says that you've got to spray aluminum within hours of stripping, or the aluminum will rust on a molucular level and that can inhibit good paint performance. (Ie, the primer won't stick well and will peel off over time.) It is time for me to re-do all the body work (Bondo-work) that I stripped off, so I figured I'd test out an aluminum cleaner that is supposed to chemically remove oxidation:

I went back to my local Sherwin Williams Auto paint store, and picked up a bottle of W4K263 Dual Etch Aluminum Brightener and Conditioner. (Don't get the W4K288. It is more common, but is for steel) It is the product on my Etch Primer spec sheet that should be used to pre-treat aluminum before spraying etch primer. I bought one quart for $25. It is supposed to be diluted 1 part with 2-4 parts water, so it yields about a gallon of acid-wash. I mixed it in a quart sized paint mixing cup.

I used a maroon scotch-brite to apply the W4K263 (which I will call acid wash, even if that is totally wrong.) to a few areas that needed bondo work. (don't forget thick gloves and tape up spots where you don't want the acid to go, like into the engine compartment) The theory is to let the panel stay wet with the stuff for 3-5 minutes, which converts all the rust (aluminum oxide, AL2O3), to something else more stable. Then you rinse it off, dilute the acid, and then have nice clean metal that will stick well to Bondo and not rust.
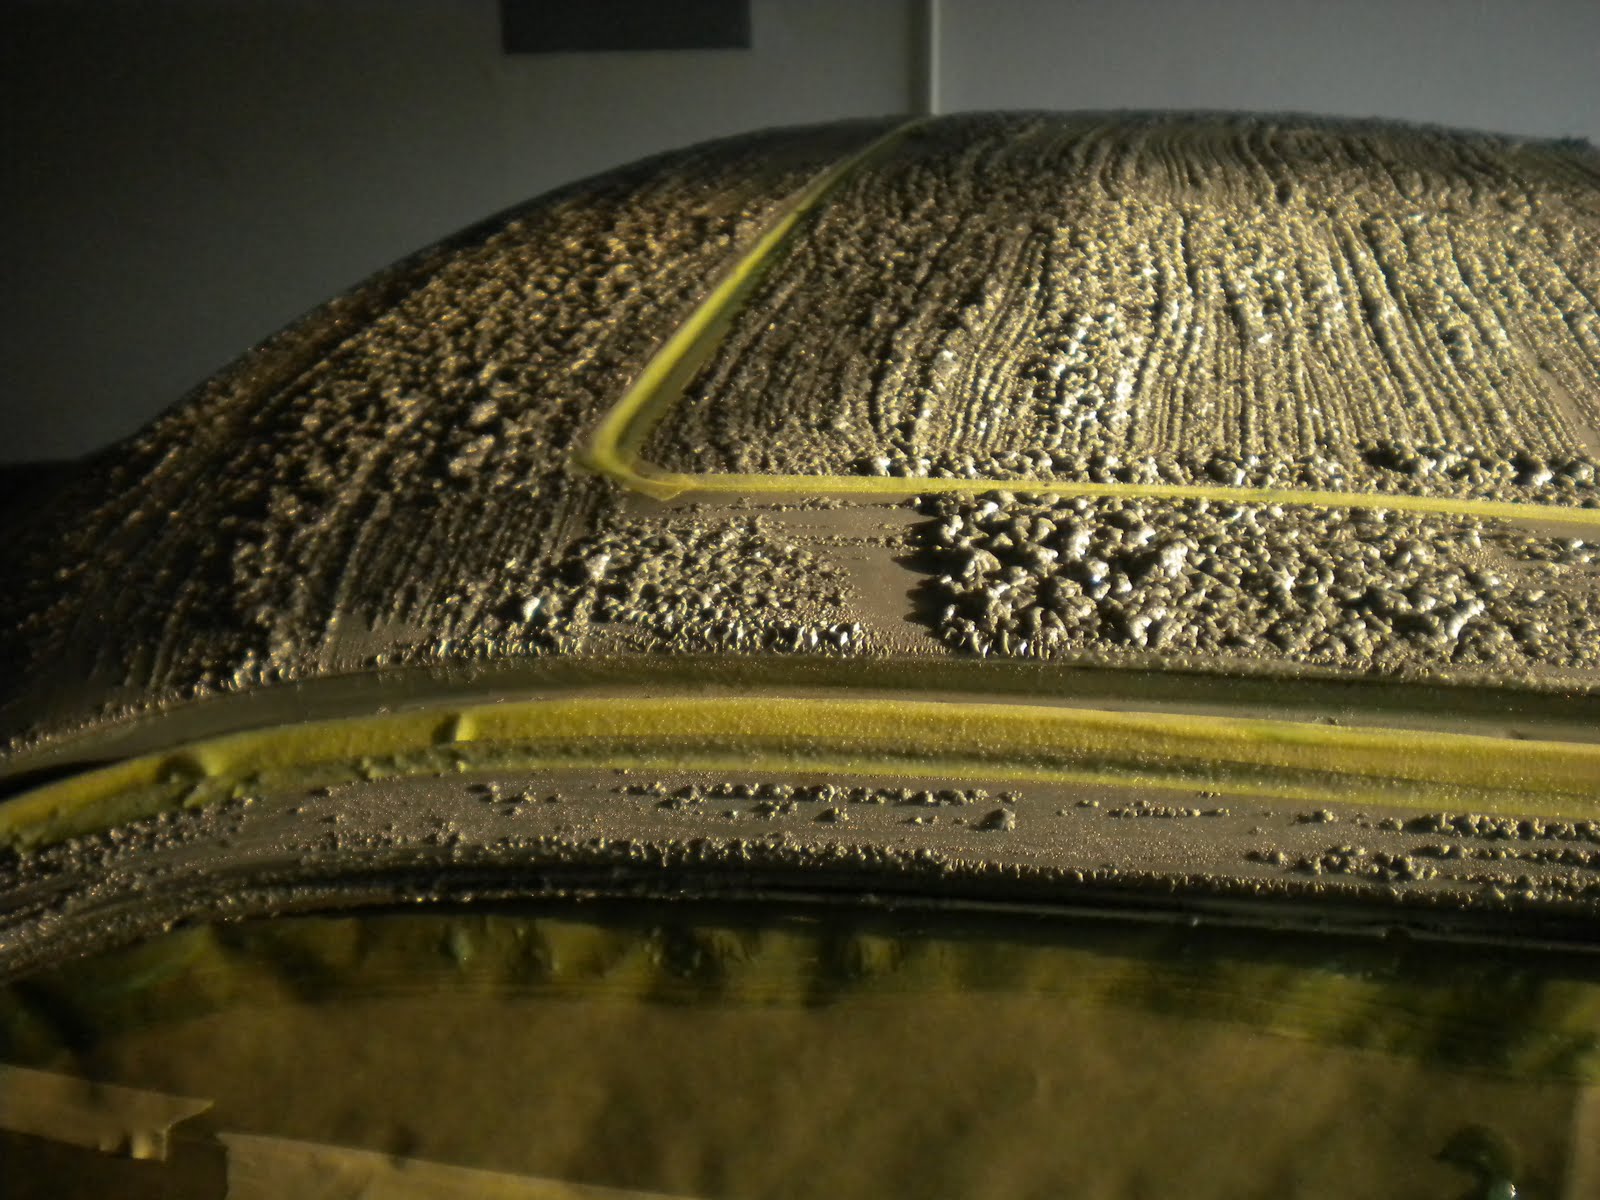
The acid wash evaporated pretty quickly, and made the metal look all streaky. I ended up having to spend the whole 3-5 minutes re-applying more liquid every 30 seconds. This also had the side benefit of me lightly scrubbing the area as the liquid sat there, helping more aluminum oxide to get scrubbed off. The last minute I scrubbed pretty aggressively. Here you can see how the rear quarter-panel is smooth and light (that's the treated panel) while the rest of the car is mottled and dark. (trash bags keep this stuff off the rubber tires.) I spent 2 hours acid washing all the spots that were going to need Bondo, and then rinsed off the spots with water:

Next up was bodywork time. I've already logged a few hours of bodywork for the 'welded' holes.But now was time to start in earnest. There are 4 or 5 areas where I'll be doing some substantial Bondo repair. Most of these areas already had a professional body-shop get the metal pretty close, but I wanted to strip out the bondo to make sure everything was uniform and that there wasn't anything underneath that I need to worry about. And I have always wanted to try my hand at Bondo, and never have.

I'll spare you the details of working with Plasticized Filler (Bondo) since there are lots of tutorials out there. I was pleasantly surprised how easy the stuff was to work with. I didn't have any tools to work with it, so I bought a smooth plastic mixing board, (8"x6", $4). And a set of 3 application spatulas ($5). The filler was a quart of Evercoat Rage for $21.

I filled in 5 areas that needed work with a nice first coat to get the panel mostly flat. My biggest tip working with this stuff, that I didn't quite grasp is that it cures in about 5 minutes. It is easiest to spread and lay onto a panel and make nice and smooth in the first few minutes, but you lose 1-2 minutes during the mixing process if you are a perfectionist, so you only have a short window, maybe 2 minutes max after mixing to get it on the panel. If you do it right after mixing, then it spreads like butter (ie, easy). If you walk around your car twice, and pause to scrape of a stray paint flake, and then try to spread it, it is stiff and unresponsive and doesn't lay down well, goes on chunky, and makes sanding a pain later. I ended up doing several small batches and laying it on fast after figuring this out.

Here the biggest fix on the car. Before, the shop had laid so much Bondo on this area that it had cracked and looked terrible. I managed to reshape the curve so it looked better and was far thinner than before. Maybe 1/8" at the deepest pit, and less than 1/16" over the majority of the area. It was probably close to 1/4" before. I was tired and decided to let it cure overnight and sand tomorrow.


Time today: 8 hours (3 paint removal, 2 metal prep, 3 bodywork (bondo and filing HTS)
Spent today: $65 ($25 for W4k263, and $10 for metal file, $9 bondo tools, Rage Filler $21)

Monday, August 30, 2010

Side-strip delete and HTS-2000 for filling holes

I had mentioned earlier that I pulled off the small rubber strips that run along the side of the car, commonly called side strips or door bumpers. The metal rail holding the rubber strips was held on with several rivets, and when I removed the rail, I was left with 10 holes on each side of the car. I purchased some special aluminum repair stuff called HTS-2000, which you can see more about here. They also have a pretty impressive video here of the stuff in action, which sold me. I even practiced a few times on an aluminum can just like in the video and it helped me feel more comfortable.

I bought two small rods of the HTS that are about the size of un-cooked spaghetti noodles. I started the process by cleaning the area around the holes about the size of a quarter.


I just used my Triangle Scraper, but you could also use sandpaper or a file to remove excess oxidation. I also used a drill bit to widen the hole a bit so the edges of the hole would be clean. In the pic it looks kind of black, but the metal has been scraped until shiny and clean:


Next, you’ve got to heat up the sheet-metal of the car. You've got to heat the metal enough to melt the HTS stick, but not too much that the metal warps. I used a small propane torch and just held it up to the hole, moving it around to heat up the area uniformly. It only took about 15 seconds for the metal to heat up. That’s about when smoke started coming out of the back of the panel. I freaked out, grabbed some water to douse flames, but wouldn’t have been able to get any water to the inside of the panel, so I just sat there and panicked. The smoke stopped and I had a chance to evaluate. There is undercoating on the back of the panel, which is really thick on the front and rear fenders, that starts to melt and burn as the panel is heated. The flame goes through the hole in the sheet-metal, and there is fire and melting paint. I ended up using a spare drill-bit and stuck it in the hole as I heated the panel, minimizing heat to the backside. There was still a little bit of stink, but it wasn’t bad.

As the panel heats up, you have to rub the HTS rod all over the area to be repaired, and as soon as the metal starts to melt the HTS, you have to pull out the drill-bit (don’t burn your fingers) and then while still heating the panel, melt the HTS into the hole just like soldering.


I laid on quite an excessive amount on the first bunch of holes until I got the hang of it. The later holes I left almost flush. I went right around the car, and welded up all the holes until they were all full.


I went back after the panels had slowly cooled and checked my welds by pushing and banging on the panels a bit. Several of the plugs loosened in the hole but didn’t fall out. Others fell out right away. I went back around and did a bunch of re-dos. Then I tested again and had two fail. More re-dos. Then I tested again and had one hole that took a few extra tries to get just right. There is so little surface area for the metal to bond to. I realized retrospectively a better way to do it.

Take a small hammer (ball peen if you have one), and gently tap right at the empty hole in the sheet-metal, making a small dimple or depression right at the hole. This way, when you weld on the HTS, there is a pea or dime sized area that stays after cleanup. Kind of like metal-bondo for the dent you made.

I thought about going back and doing this for all the holes, but was already concerned about how much heat I’d already put on the panels. I’m sure that I’ve had some metal distortion, and can see some minor waviness in the panels that I’m hoping the filler primer will cover up. In retrospect, I’m happy with what I did, but imagine there might be some other product out there that would do a similar job, but without the heat to the panels risking fire, and messing up my nice straight panels. You could maybe even get away with denting in the hole and then filling it with actual Bondo, but I think there’s too much risk there of it causing problems later on down the road.

Once that was done, I spent some time sanding and grinding down a few spots where the paint had failed and the car had started to have some minor surface rust.

Total time spent today: 2 hours
(I won’t count the cost of the rods here since I added them in earlier, they were $2.50 on ebay)

Friday, August 27, 2010

There's always one more bit.

Today I put some more stripper on a few last stubborn spots. The indents on the doors where the handles are were pretty stubborn, and also the Tail. I applied stripper just to where there was paint, and then scraped it off after 45 minutes or so. I exclusively used the Triangle Scraper today.

I also applied some stripper to the front and rear bumpers and scraped them clean as well. I also applied stripper to the rain gutters that I had pulled from the car, which are a PAIN to deal with. They are too thin and light to stay put on the floor or on the saw-horses we've got set up. And they are deeply grooved (in the channel the rain runs in) to be able to brush stripper into. I think I'll end up sanding them most of the way.

I also tried stripping through the primer on the sunroof, only to find some thick layer of white paint or plaster, or bondo underneath. There definitely isn't metal on the sunroof where there ought to be (Ie, within a 10 mils of the surface. So after scraping some nice deep holes looking for the sheet metal, I think I am going to bondo my holes up and just sand it smooth.

Then I spent four hours fighting with Bondo. I had a few spots where there was previous body work and the bondo wasn't all off. The stripper really helped to dissolve the bondo, but frankly, it was just as easy to just really muscle the Triangle Scraper into it and scrape it out quickly.

The entire rocker panel below the passenger door had some bondo on it, which I ignored until today. Once everything else was stripped, I decided to attack it. It turns out that some heavy handed body-man laid on about a half inch of Bondo trying to get the panel right and built it up way too far. Below the bondo was a ton of rusted out holes that may or may have not been from a body panel puller. I scraped for a few hours. It would have really helped to have had an angle grinder, or power tool, but I honestly didn't expect the bondo to be so thick or deep. I also realized that the body folks didn't protect the backside of this panel, and it had some minor rust starting to form. I'm going to have to spray the back of the panel now that I've removed the rust so the problem doesn't continue.

Total time spent: 6 hours

We've got a painter down!

I've been trying to hurry and finish this job before my friend Jesse moves, for a few reasons:
1. He's providing his garage
2. He is providing free labor (I don't know why, but I love it)
3. He owns the nice expensive spray equipment
4. Most important, he is supposed to lay on the paint so it actually looks good. As a professional painter who uses his spray gun all the time (even though he specializes in spraying paint and dye on woods...same technique), I'm depending on his trained hand for the most critical part of the job.

Well, he was running through his house to answer the door and slipped on a spot of wet tile, and landed smack on his foot. He broke it in a few places, and tore some tendons, and is currently at the hospital getting morphine and x-rays. Ugh, this is going to make things a whole lot more difficult, unless I can get him off his pain-killers and get him to lay out a nice straight coat of paint all while hopping on one foot. (ie, no way!) Looks like I'll be doing the rest of my labor solo and painting the car myself.

He wouldn't let me take a picture, but it looked about like this:

Thursday, August 26, 2010

Na na na na, hey hey: Goodbye Paint.

Out I went first thing and bought my third, and last, gallon of MarHyde Tal Strip II. Jesse was kind enough to brush on a bunch of it first thing in the morning so it could sit all day and dry off so we don't have more problems like yesterday with the wet stripper getting all over the place. He used about 3/4 of the gallon on the whole car, and probably could have used a bit less, but we both decided to just slather it on and be done stripping. (If you are stripping just factory paint, I bet you could do the whole car with two gallons total. I just needed extra to get rid of the Maaco job and because of deciding to start to strip on a 90 degree day.)

I showed up after work and scraped the car off as explained over the last few days.

A unique twist occurred today. In all of the spots where the paint was gone and the stripper was applied over metal, the stripper had dried to a gel like consistency, yet remained fairly potent. It was easier to just brush the whole car, instead of all the patchy spots that had paint; but keep in mind that the gel stripper that has dried on the metal can burn you. I found myself being pretty careless, like I had been with the dried stripper in the past days, which was mostly neutralized. This led to lots of burns through my gloves, and several where I thought I had cleaned off a lower panel, yet leaning against the car led to burns through my pants, or was transferred to my skin from my pants later on. The burns don't hurt too bad, as long as you get some water on them when you start to feel them tingle. Then again, you'd be hard pressed to just ignore the pain which escalates rather quickly once a tiny bit of this stuff is on your skin. None of my 'burns' left any marks since I was quick with the water.

The books all recommend at this point, scraping off what remaining paint you have, and then using a scotch-brite pad to scour off the last bits, perhaps using running water. I didn't want to bring water into the garage or get it all over, and so I opted to just run over the entire car lightly with the Triangle Scraper and remove every last bit of paint. I'm sure you could probably get away with leaving small flecks here and there that would just be covered by primer, and would all even out when the car is block sanded, but I haven't spent all this time to have some small bits of paint come back to haunt me. So I spent several hours finding every last pinhead sized spot of paint or primer left, and scraping it off. I had to spend a ton of extra time on the rear end of the car around the license plate where all of the curves and inverted angles kept the stripper from laying on thick and stripping well. I got just about all of the car paint free, except for the door handles and several large sections of body work with really deep filler.

One other tip that I picked up during the process from some blog, that wasn't mentioned in any of the books I read was that you need to avoid Steel Wool at all costs. I was planning on scouring the last bit of paint with it, but it turns out that small bits of steel can be deposited in the cracks and sand scratches of the aluminum, and hasten rust. It is safer and easier to just use a coarse 3M Scotch-brite pad. I used the maroon ones. If you see them in the picture, they look unusual because they aren't normal rectangles. They are torn or cut from large 24" pads that Jesse uses for refinishing floors.

Also note: at this point, I kept finding myself scraping some of the oxidation off the aluminum to show the pretty shiny aluminum underneath. Most of the aluminum directly after stripping and sitting in the garage for a few days is pretty dark and splotchy. I probably spent two hours scraping at spots that didn't have any paint, just because I was so desperate to see the panels even and well prepared. This is a waste of time. Once the paint is off, stop, and leave the aluminum cleaning for later. It all comes off really fast with the right tools (ie, chemicals) which I'll do in a few more days.


Time spent today: 6 hours (1 brushing, 5 scraping)
1 gallon stripper: $36

Wednesday, August 25, 2010

I got a fever and the only prescription: More Stripper

I started out the day grabbing another gallon of Mar-Hyde Tal Strip II. When I got over to the car, I was pleased to see that the second coat we'd laid down a little thicker had done a lot more to lift the paint. The great thing about leaving this stuff overnight was that it lifts the paint and then dries completely. So when you scrape it off, it just flakes off and doesn't stick to anything. It's a tad dusty, but not too much of a pain. Here's the hood after a light scraping with a plastic scraper (I used a plastic bondo mixing paddle kind of thing, you can see it on the hood)


Here in this close-up, you can see that the factory clear is mostly off, and there are a few spots where the factory paint and primer are gone, and the aluminum in starting to show through in spots. The bare aluminum is the darkest spots in the picture:


We spent another half hour doing a light scraping off the rest of the car. We had to keep remembering to just take off the loose paint and not scrape into the paint that hadn't lifted yet. It was hard not to get carried away with the Triangular Scraper.

We had some extra time, so we decided to apply the next gallon of stripper. It was a lot cooler today, in the mid 70's (yesterday was around 90*). The stripper went on a lot better. The instructions on the car say that you shouldn't use this stuff above 90*, and it obvious now why. The stuff dried before it even had a chance to work. At the lower temperature today, it was easier to apply, and it didn't evaporate as noticeably as before. We laid down the stuff as thick as possible, maybe 1/4" thick on horizontal surfaces, and 1/8" on the side panels. We used about the whole gallon of stripper, and I even went back and applied more to the thin spots. Here you can see clearly how the paint is lifting really well, and there are very few thin spots:


Here is a closeup of today's stripper in action, and you can see the metal starting to show up under the stripped paint:


Here is some body work under the paint that I didn't know about. The reddish color is the bondo / body filler starting to peel up. Body filler does get dissolved by the stripper, but not to the same extent as the paint. It just gets a little spongy, and scrapes up easily, but it doesn't bubble and lift like paint.


We let the stripper sit for a few hours, but still had a little bit of stripper left in gallon #2, and some time. So we decided to scrape off the stripper and paint that had lifted even though it was still wet. This turned out to be a bad idea. We had assumed that the stripper would have lost its mojo by now, and would lift any more paint, but what a mess. We used the big plastic scrapers to scrape the panels off, and stripper started to get everywhere. When we originally brushed it on, it is pretty controlled. There are very few spills, and it barely gets on your gloves. But when we were scraping this wet coat off, it was getting all over the floor. I kneeled on it a few times (It immediately burns the skin through the jeans, and I had to go hose my pants off until the stripper was neutralized.) It burned through my gloves a dozen times until I rinsed them off. It was hard to not track it all over the garage. It formed giant clumps on the ground that I kept stepping on. I accidentally leaned up against the car with my arms and legs and it just got everywhere. If I could do this over again, I'd let it sit overnight every time. The extra time would be worth not having to deal with scraping this stuff wet, unless you are really in a time pinch.

{This is also a great time to mention that it really helps to have some kind of cover on the ground for all the crap you are scraping off to land on, wet or dry. You can use cardboard boxes or thick paper. I had some butcher paper sitting around that we taped to the ground starting 12 inches under the car, and extending out about 20 inches past the outermost panels of the car, all the way around. It should simplify clean-up, and gives a place for all this crappy wet stripper and paint to land. Here is mine in action:}


{We are also tracking stripped paint all over. If you have an old doormat or leftover piece of carpet you can put at the edge of your workspace, it can really help. I ended up just wearing thick socks and flip-flops that I could kick off before I went into the house for a drink.}

We then went back over the panels and did some pretty aggressive scraping with the triangular scrapers to clean off some deep filler spots and to knock down some of the spots that had a lot of paint left, or that just hadn't lifted as well as other parts of the car. I knew we'd need one more gallon of stripper tomorrow, but wanted the last coat to lift up everything else and got carried away scraping. Here is a picture of the panels after this third coat (which was gallon #2):


You can see here that the headlight covers totally stripped after just two coats. The rest of the hood is mostly stripped.


Again, the lighter spots are where the factory paint is still there and the mottled dark gray is where the bare aluminum is showing through. The silver shiny spots are bare metal that was scraped too aggressively, or is catching the light just right. Also, you can see the tape is getting pretty hammered, but is still hanging in there. It actually was perfect because the stripper was soaking into the tape and starting to weaken the paint underneath, but the stripper wasn't dripping anywhere it shouldn't be:


We threw on what stripper was left from gallon #2, and called it a night.

Time spent today: 6 hours (2 guys x 3 hours)
1 gallon stripper: $36

Tuesday, August 24, 2010

There's nothing better than a great stripper!

Now that the car is down to what is actually being painted, it is time to strip the paint off the car. Again, I probably should have just sanded down the paint past the maaco crap, and sprayed the new paint, but I was curious to see what body issues the car has, clear up any rust, fix some problem spots of my own, and it should take about as much time to chemically strip the car, and with way less work. (note from future self: wrong!)

After reading around, it seems that the strippers all function similarly in testing. (some of the aerosols lay on thicker and so perform better, but that is too expensive) You should go to your paint shop, or local auto parts store, and buy a gallon of the Aircraft Grade chemical stripper. Mine has the base ingredient of Methylene Chloride. I bought the Mar-Hyde Tal Strip II brand at Schucks/O'Reilly for $36 a gallon. (Mar-Hyde is owned by Bondo)


This stuff is completely nasty. It will start to burn skin on contact, and though it smells pretty good, (kind of sweet, almost) the fumes cannot be good for you. As the books I mentioned earlier, I recommend being pretty conservative here, safety wise. I wore disposable shoes that I could throw away when done, jeans I planned on trashing, and a long sleeve shirt I could trash. (It's summer here. the long sleeves and pants are to cover all skin.) For safety, I bought a pair of nice thick Chemical-Resistant Nitrile gloves ($7), and a 3M respirator mask that is graded for filtering organic chemicals (it specifically lists Methyleve Chloride on the box, $40) I'm pretty sure all the pink ones are Organic Compound compliant.


The gloves you could maybe scrimp on, since you can feel your skin burning when you get this stuff on you, and you just have to run to the hose and hose it off, neutralizing the acid burn. But I would not recommend scrimping on the mask. You can get them at Home Depot, with replaceable filters. Make sure it is not just one for dust and debris. when it is on, you shouldn't be able to even smell any chemicals if they are right in front of the mask. Just be safe. this stuff drips everywhere, and then you accidentally kneel in it, and it gets on your gloves, and you wipe your hair out of your eyes, and it burns everything. It can even melt though gloves and burn your hands (if you don't rinse it quickly off.) (FWIW - my green gloves didn't seem as robust as my buddies orange gloves.)

Also, aside from burning you, you don't want this stuff dripping into your car anywhere. You have to mask off everything. I decided to just mask of anywhere the stripper could drip. All holes, all seams, all gaps, all window edges, etc. Also note: Everything I've read recommends you go to your paint store and buy a roll of nice masking paper for your windows, etc. I bought a roll of 12" masking paper ($5), that is 55 meters long and barely used any of it for the first mask. You can see here how the car is looking all taped up:


I also taped up the holes from the side strip delete that I haven't patched yet. Don't forget to tape in the sunroof drainage holes just in case. I sprang for the nice 3M tape from the paint store ($4), and the 18mm roll was just the size to cover the gaps of the doors and hood enough to keep stuff out, but to maximize the paint on the surfaces being stripped. I also bought a pair of cheapo 3" brushes for applying the stripper ($1.50 each). I initially bought a bunch, assuming that they would break down in the stripper, but they lasted great over several days. One brush per person will do. Applying:


I've read that you should brush the stripper on and then cover it with plastic so it doesn't evaporate. I couldn't find a good effective way to manage that without making more of a mess, and on some side by side tests, I didn't see that much of a difference. It was about 90* outside, and the stripper was evaporating more quickly than I'd have liked, but where it went on thick, it did the job. Here's what it looks like after 5 minutes, and 15 minutes:


After brushing a ton of this stuff on, here is what worked best. Scoop up a bunch of it with your brush, and glop it down onto your panel, trying not to drip. Smear it onto the panel, trying not to push hard with the brush at all, pulling your brush along the panel almost parallel, instead of the regular 45* brushing angle. It is almost like smearing on a thick layer of bondo. You want to only brush once, maybe twice. Any more than that, and you just end up thinning out the layer, which is bad. You want the stuff to go on thick. After about 1 min, it will start to bubble the paint up. You can look back and see spots where you left it thin. Go back and glop on a bunch more before getting to the next panel.

I did this around the whole car, and then let the thing sit overnight. I think that letting it dry completely and have maximum time to work is easiest, and is WAY cleaner. The paint just flakes right off instead of scraping off stripper that is still working and getting a mess of active stripper in wet clumps on the ground to step on and track around. (ask me how I found this out.) Here's what it looked like the next morning; You can see where it went on thick and bubbled, and where it went on think and just evaporated, not stripping anything. Even this was still too thinly applied:


Here is what it looked like after the stripper was lightly scraped off. The bright silver you see under the lifted paint isn't sheet-metal, it is the factory paint finally showing up:


It took just over half of the gallon to go over the whole car really thin. (I started out way too thin). With it being so hot, it had totally dried in about 2 hours, and we were able to go back and scrape all of the paint off. It was mostly the maaco paint and some of the first layer of factory clear that came up. We tried using scotchbrite pads to scrape off the stripped paint (bad idea, clogged too fast), putty knives of all sizes (OK, but they need to be sharp and the angles weren't the best), big plastic bondo spreaders (5" x 4", worked ok for big chunks, but didn't catch smaller stuff and didn't scrpe at all.), and then the Bahco Tiangular Scraper. This Bahco scraper was by FAR the best tool for the job. Not only did it pull off the stripped paint easily, but with a little extra pressure, it ate into the next layer of paint, giving the next coat of stripper a head start. Genius tool. You might even have a carpenters glue scraper you could use too.

This is the hood starting to get a second coat:


Jesse and I worked out way down the car realizing we'd put the stripper on too thin, and it didn't pull up as much paint as we'd hoped. I in particular was hoping that one gallon of stripper would do the job, and realized I'd be lucky to do it in two. We both ended up scraping pretty agressively instead of letting the stripper do its job, partly because I didn't want to have to buy more. We used what more of the stripper we had left, slathering it on extra thick (covering just the front third of the car) and let it sit overnight. Here you can see the quick work the scraper did on the paint after the first round of stripper came off. We were hoping leaving 'grooves' like this would let the stripper soak in better on round 2. In this photo, the matte Maaco paint is gone after the first strip, the metallic color is factory paint, the whitish color is a basecoat or primer, the black (which was only on the headlights) was maybe an etch primer, then you can barely see a sliver of bare aluminum on the right side. you can also see the tape held up pretty well to the stripper:


Here is the second coat of stripper after it has bubbled for 15 minutes. We left it overnight:


Time spent today: (10 hours = 2 guys x 5 hours)
Stripping supplies: $39
Masking supplies: $9
Safety Gear: $47

Monday, August 23, 2010

Clean, Dismantle & Dis-assemble

No more joking around. It is time to take this car apart. First things first: My deep thanks go out to Ben and Beth H (my bro-in-law) who lent me their beater '95 Nissan Pathfinder so that I'll have something to drive while my 944 is out of commission. I was trying to figure out a way that I could do this over a long weekend and drive the car between stages. I now realize this would not have worked. Maybe if I had survived on Red Bull and had 2 helpers and worked non-stop. It is so much better to just be able to work on the car for a few hours after I get home from work and be a little more leisurely about it.

This brings up another note. Many of my estimates for time spent are pretty forgiving. If I note here that I worked for an hour, it means 40 minutes work, 5 minutes referencing manuals to not screw things up, 5 minutes snacking or grabbing a drink, 5 minutes consulting with my buddy so as to not screw things up, and 5 minutes stretching my muscles which are not familiar with the concept of manual labor. If you are any good at this, you could take 25% off my times, maybe more. I was trying to take things easy, not hurt myself, and maybe even enjoy the process a little. Hopefully, all this data gives you a better idea of the scope of painting a 944.

So, back to taking apart the car:

First, Jesse and I broke out the power-washer and hosed down the car, then proceeded to give it the wash of a lifetime. We scrubbed the thing with pretty harsh pads and soapy water, and took time to hose off as much of the undercarriage and wheel wells as we could. In retrospect, I wish I would have been WAY more thorough during the washing in the wheel wells and below the rocker panels. [Later in the process, when taping up the car for spraying primer, I could not get my tape to stick behind the panels because they were so dirty. You would be wise to run a rag across the areas that will be getting tape adhered to them, and clean them until that rag comes off clean. I also had a ton of dirt caked to my carbon filter, up under the panel that holds the antenna, that made a substantial mess later on when removing the antenna.]

We dried the car with garage rags, and started dismantling anything that could come off which covered paintable metal. I didn't take pictures of all this,and many of the procedures are found on clarks-garage.com. This is what was removed, and estimated times for removal:

Rear Hatch struts: 30 min (yeah, yeah. One popped right off. The other took some figuring out. More here)

Rear Hatch: 15 min (Four bolts at the top of the hatch, covered by plastic on interior of car roof, easy. More here. If you notice the seal is compromised, now would be a great time to do this DIY repair)

Rear Quarter-panel windows: 2 min (don't mess with the seals, just lay in the bed of the car, put your feet on the glass, and push with both feet REALLY hard on one edge. The whole window (and seal) comes out slowly enough you could do it solo, but have a buddy catch it.)

Rear Hatch Seal: 15 min (This is the seal that sits on the edge of the car-part of the hatch, not the glass part. It peels right off, but leaves a nasty waxy sticky residue that took a bit to clean off.

Taillight Assembly x2: 1 hr. (This has all these little bolts that are a pain to reach and I had to keep removing carpet and such to get to them. Once the bolts are off you have to pry a bit to get the thing out and break the gummy weather seal, which was also a pain to clean up. Use the balled up sealant as an 'eraser' to get smaller bits) Here's a picture so you can see some of the mounting bolt spots:


Rear quarter-panel reflectors: 5 min

Rear license plate holder: 15 mins (The bolts both stripped and had to be cut off. They were very rusted.)

Main Rear Bumper: 15 min (2 big ol' bolts, not much wrenching room, 19mm)

Corner Rear Bumpers x2: 20 min (There are a couple of bolts holding on the plastic corner bumpers. I couldn't find a way to get the socket wrench around them. I had to use a crescent wrench and it took a while. Also note, If you can reach, it is better to take these off before the bumper, because they are molded to fit around the bumper, see this pic (sideways, sorry). If you can't get them off first (as I couldn't), then you can carefully pry them off the bumper as the bumper is removed, and then take out the bolts holding these on.)


Rear bumper pads: 15 mins (3 bolts each, spray them with bolt loosener first or they'll snap, 10mm)

License Plate lights x2: 5 min (These are two small lights that are above the license plate and need to be unscrewed from inside the natch area, and then pried carefully up away from the metal. They are held on with adhesive or sealant. I accidentally broke one when prying on it.) See pic of hole:


Gas Cap: 2 min (there are only two easy to get to bolts, but once removed, you have to wiggle and jiggle the gas cap to the left while nearly closed.)

Gas Cap Rubber surround seal: 1 min (In my haste I pulled this right out, not realizing it has a gas drain hose which will probably be a super-pain to reconnect. I probably should have just let this be, and painted around it. See later pictures for where I think the best spot to tape is for a color change.)

Outer door handles x2: 20 min (more here)

Interior door panels x2: 40 mins (I pulled these off to get better access to the rear-view mirror guts which were causing me drama, and because I'll be painting the door jambs and door edges.)

Rear View Mirrors x2: 2 hours. (I fought with a stripped bolt on the drivers side mirror for an hour before drilling it out completely. It's a hot mess, and I have NO idea how I'm going to get that mirror back on. I might have to drill and re-tap it. I should have used bolt loosener first, and a better fitting hex wrench. It should have taken 5 mins)

Antenna: 45 min. (My antenna hasn't been working in the past years, so I wasn't to keen on saving it, thinking of converting to a windshield antenna some day, or troubleshooting the problem. Anyway, to get the antenna off, you have to remove the front wheel of the car )or crank the wheel way left to get more clearance, then pull out the carbon filter (by removing the hose from the top), and then you can see and maybe reach the antenna base inside this panel. You then have to try to grip the base and unscrew the antenna from the top. I couldn't get a good grip and ended up mangling the washer type of thing that is part of the bracket holding htis thing on. Eventually it came out with lots of coaxing. I just snipped the antenna wire and will solder it all back up if I ever decide to replace the antenna. In the mean time, I hear that Home Depot has some rubber plugs in their screw drawers that will fill the hole nicely for $2 (after the paint goes on).

Hood windshield-washer sprayer tips x2: 5 min (You just have to pinch these on the back side with pliers and they pop right out.

Headlight Covers: I took them off, and then ended up putting them back on for stripping and paint.

Porsche emblem, 944 emblem, and side panel bumper strips were already off.

Front license plate holder: 15 mins (The bolts both stripped and had to be cut off. They were very rusted.) 

Front Main bumper: 5 min (Two big ol' 19mm bolts.)

Reflectors and bumper pads from Front bumper.: 20 mins

Front Spoiler: 1.5 hr (On each side of the bumper there is 1x 10mm head sheet-metal screw at the bottom of the fender, 3x 8mm screws across the side, right above the parking light, 4x 10mm bolts near the fog-light, 10mm bolts underneath the spoiler. Good luck, most of these were a major pain to remove since they are mounted to plastic and require ginger hands to keep from ripping the spoiler. The three bolts on the drivers side at the top of the spoiler that keep it flush with the quarter panel and most easily accessed from inside the wheel well, without a wheel in the way, and they take torque from both sides (ie, a wrachet from the top and a crescent wrench from the bottom.)

Last off was the window trim. I really didn't want to paint the car with the trim running along the top and bottom of the window. I had started to try to pry it from the back with bad results, but I didn't want to have to mask this part crappily. It turns out that you should pry the trim (the thin black metal piece) from front to back, carefully with a small flathead screwdriver. It slowly pulls out and when you work your way back to the rearmost potion of it, there is a small tab that goes into a small hole on the door. I seem to remember reading somewhere that these are extremely difficult to put back on.

You can see a picture of the tiny hole in these pictures where the black and silver paint meet:


Lastly, I pulled off the rain-gutter strip that runs along the side of the roofline, fron the hatch, down to the hood. This piece is thin aluminum, and I just pried at it until it slowly started to come off. It is going to be a pain to strip and to put back on.

Total time today: 14 hours (7 hours x 2 guys, though we spent some time watching each other work, and there were some lame setbacks with uncooperative bolts.)

Saturday, August 21, 2010

A Clean, Well-lighted Place

One of my best friends, Jesse Christensen, is my hero. He is a professional wood re-conditioner, using his fancy-schmancy HVLP spray equipment to spray dye and other finshes onto wood floors and cabinets. He is interested in restoring an old Mustang some day, and offered his experienced painter-hands to spray my car. He also offered his great equipment. He also offered half of his 3 car garage. And since I'm at his house, he feels guilty enough to come out and give me hours of labor to get this car sprayed before he moves next month. (3 weeks! yikes)

We decided to build a spray booth in his garage. In theory this should be a contained room made out of 1 mil plastic sheeting, with 2 filtered fans down-drafting from the ceiling creating positive pressure, and another filtered fan blowing along the floor from the side, and a fourth un-filtered fan on the opposite side blowing out under the semi-closed garage door into the driveway. Here's a rough plan without showing the box fans, which would rest on 2x2's running across the span between garage door rails, and also not showing the plastic covering the ceiling, or the supplemental fans on the ground and accompanying filters:


We didn't really want to build an entire structure (lumber costs, ugh!) and decided to see what we could jimmy rig. The ceiling came together nicely, after 4 hours of fiddling, and we even managed to make some mounts for two ceiling fans that we suspended a few feet beneath the ceiling of the garage, but at the top of the booth ceiling. We put up some plastic sheeting for the walls, and were about the do the floor and the other two sides, when we realized the booth would get all dirty during dis-assembly, and during washing, and stripping. We also realized that the stripping and priming don't really require that clean of an environment. (I know you should spray primer in a 'clean room', but I'm just going to sand it anyway, so I don't mind sanding all the dirt and bugs out.) We stopped building a booth and decided to finish the booth after priming and block sanding, but before final cleanup and paint/clear.

One of the biggest considerations we had was whether to paint with the garage door open (more light), half open (some light, easy place to vent booth air), or closed (less light, vent air into garage, BUT be able to access garage-door rails for structure). I'm not sure the best answer. Having to build a booth and ensure that the door could remain functional was pretty tough. I knew I didn't want to be washing the car after sanding in the booth, so this is kind of where we stalled out and decided to start the process without the booth, and just build it right before paint.

Here is what we spent tons of time on today:

(Insert pictures of ghetto booth, which I don't have because I used my friends camera... Send me the pics Jesse!)

We used 2 fans we had laying around, and some shelving for braces that would have otherwise had to be constructed.

Supplies I bought for the booth:
5x plastic sheet (10' x 20' x 1mil) for the walls & ceiling, $1.50 each
1x plastic sheet (10' x 20' x 8mil) for the floor, $4.50
2x box fans (20" x 20", X Brand) $15 each
4x 2"x2"x10' lumber, for framing, $1.50 each
1x fancy plastic-use duct tape, $4.00 a roll.

I also bought 2 fluorescent light setups from Home depot. They were $10 each + $5 for 2x 48" blubs (3200 lumens each). They really would have brightened the sides of the booth up, but I decided to take them back and use a series of halogen lamps and fluorescent floor lamps once we have the booth up and running. If there isn't enough light, I might go back and pick up the cheapo fluorescents.

Total time 6 hours (3 hours x 2 guys), $42

The Perfect Tool

So, you need to scrape the dumb adhesive off your car. There's a tool for that. Oh, and you also want to use it to remove dry paint, and chemically stripped paint, and smooth out excess Bondo, and everything else? There's a tool for that. It costs $15, and I wouldn't think of doing this job without it.


It is called a Bahco (formerly Sandvik) 625 1" carbide Triangluar Scraper. I'm just listing it here because I ended up using it a ton when no other tool would do. And it saved me a ton of headaches. I highly recommend this tool if you are stripping to bare metal. Or, you could just use a razor blade, like this guy.

Total cost: $15

Thursday, August 19, 2010

More Trim; Careful with the Windshield

I had a few hours, and still am not ready to paint, so I figured I'd pull off some more trim. I took off my 944 emblem (from the rear right of the car just under the rear spoiler). It is only held on with adhesive, so more work with the razor and some very careful prying and it came right up. Don't forget to take some pictures if you plan to put it back in the exact same spot.

Next up was the Porsche emblem on the hood. I had read that these screw on to the hood and the screws are a devil to get to. I looked for screws on mine, and couldn't see any. So I just got a small screwdriver under the edge of the emblem, and gave it a pry. It popped right out. Apparently, the emblem has two thick pins that extend down into plastic sleeves mounted in the hood. The friction from the sleeves (and maybe some adhesive, though I didn't see any on mine) hold it in place. Here you can see the little plastic sleeves that the pins go into. You can also see how nice and shiny the factory paint is under the emblem which wasn't removed by Maaco. I almost think I could get away without a total strip of all the paint, but I'm pretty sure it would be just as easy to strip off all the paint as it would be to try to sand through the crap paint to the factory paint or primer. Plus the factory paint is startin got fail in a few places. Oh well.


Next up is the rear hatch lock seal. It is some kind of plastic or rubber ring, and mine has been busted for some time. I tried to pry it out and it just fell apart. I shoved what I couldn't grab to be retrieved from within the hatch area, behind the carpet next to the internal taillight assemblies. I'll have to buy a new one of these. $4.75 on Pelicanparts.com (477-827-529A-M100).


Next up is the only other non-essential trim I could easily identify. The windshield trim. On my 944, the windshield is surrounded by one piece of metal trim on the top, and one on each side.  I think there is a rubber gasket that is supposed to be on the sides, but mine only had the metal. You can easily see between the glass of the windshield and the metal trim that there are a series of clips that hold this trim in. They look like this:


In theory, you should be able to slide the clip to the left and the clip will disengage from the post it sits on. This will release the pressure on the edge of the trim that is sandwiched between the two halves of the tab, like a a bookmark in a book. You can see in that picture how I am pushing on it with a screwdriver, than I tried hitting the screwdriver with a rubber mallet, then with a hammer. I just about broke the galss a few times.


In this picture above, you can see me holding the trim sideways, and the small square hole in the trim that rests in the tab, yet around the post. Hopefully this gives you an idea of how this stuff is held on. After getting the same 'nothing happening' results with all of the tabs, I decided to give up and try a different method: The pry and pray:


I just took a small prybar and a regular hammer and pried up gently on the edge of the trim near the top. (In retrospect, I should have put something under the hammers to distribute the pressure, like a small board or at least a towel). The trim easily slid up and out of the tab. I only lifted it a half inch and then moved down the trim until all the tabs were half out, then repeated. If you pull up on just the first tab without loosening the rest, then you risk bending the trim. Once the trim was off, the tabs all came off easily. They look like this:


I can't imagine trying to lift up the top trim to disengage any of these clips the "right" way. I did the same thing and slowly pried up the top trim without any problems. Here is a profile view of the top trim so you can see what you are dealing with:


Once the top trim was off, I was confronted with a ton of trash and dirt and sloppy silicone all around the windshield. I did some cleanup, and will probably have to clean up the edges so I can get paint down in there. Here is a close-up of the top of the windshield without the trim.


That's about all the trim that I can take off for now. Just a few more days and I'll have a borrowed car I can drive while this 944 (my daily driver) can be dismantled enough for paint. I cleaned up all the areas that I took trim off. I probably could have done this all in about 30 minutes, but I'll call it two hours due to all the fiddling it took to get the trim off without knowing what I was getting into.

Spent today: 2 hours, $0
Spent total: 4 hours, $2.50

Saturday, August 14, 2010

Starting somewhere

Well, I've saved up enough money to start buying supplies. I haven't got quote enough to get paint and clear too, but with etch and primer and supplies, I feel ready to get the party started. In reality I went on a shopping spree, and purchased a whole box of supplies, but for those of you following along at home, I'm going to list the products I bought when I actually use them. So for now, it's still no money spent on the car.

One of the big problems with the existing crappy paint on my car is that the shop that did it barely masked off the car at all. There is tons of rubber that has all been totally or partially painted gold. Much of the trim was painted on the car, and the edges all show the factory paint. So, I was pretty determined to pull off all the trim that I could. I started today just going out to the car to fiddle around and see if anything non-essential would come off, but still allow me to drive the car around.

One thing I really want off is the bumper strip along the side of the car. It is great for keeping the doors from getting dinged, but it looks pretty bad, and mine is pretty faded. I had to do some research on how to get it off. I think the later cars are a little different, but for pre-85 944's, you have to start by pulling the rubber out of the trim. You just have to use a knife to pry it up, and once you get a grip on it pull it all the way out.


I was bummed to find pop-rivets along the metal-holder-strip. I had to drill out the rivets, which took a while, and left me with 10 holes on each side of the car. They are about 2mm across. Once you have drilled out the rivet, the front part of the rivet will fall off the front, and the back part of the rivet can just be shoved back and will fall into the door cavity. (you can pull off the inside panel of the door and catch them if you need to.) Also note, the end caps of each strip are held on by this rivet and a bit of adhesive. Once the rivet is out, the end caps should slide right out of the strip.


Next up, I used a razor blade (It's actually a gasket scraper, which is a blade on a long arm. Great tool), to cut behind the strip to loosen up the adhesive a bit. I just shoved it in as far as it would go from both the top and the bottom along the whole length. (That's what she said.)


Then, you can either pry off the strip, which can deform the metal, and/or ruin the trim; or you can slide some really heavy fishing line behind the strip and slide it through the adhesive to sever the adhesive completely. I used Dacron fishing line I had sitting around which is 100 lb test or so. you could get away with something a lot weaker, but dental floss might be a tad too weak.


Once you've done this the strips should just pop right off. Here you can see how much adhesive remains, and the holes. You can also see the gravel guards that are peeling off in a serious way, and if you look really close, you can see how splotchy and faded and matte my crappy paint is. It has 0% gloss.


I'm pretty sure if I just bondo the holes left from the bumper strip delete, the bondo will pop out when I hit my first speed bump, so I'm going to have to find a better solution. I don't really have an extra $50-100 to have a welder take care of it, and I'm really trying to see how much of this job I can do myself.

A little bit of searching around on the internet led me to aluminumrepair.com, which is a commercial site for this stuff called HTS-2000. It is an alloy metal that can used to fill in holes the same way solder is used. You heat up the aluminum until it melts the rod, and the alloy flows into the hole. Then you sand it flat. They have some crazy videos on their site. One shows them fixing a screwdriver hole in an aluminum can in less than a minute, and then trying to pop out the weld and it is super-strong. I didn't want a pound of it, so I just bought 2 rods from e-bay for $1.25 each.

I used a razor blade to scrape off as much of the adhesive from the now-gone side bumper strips as I could. I also tried to scrape off the rubber from my side-panel gravel guards. Just behind each door on the 944 there is a large clear rubber pad that supposedly protects that area from rocks kicked up from the front tires. I'm pretty sure they fail universally. The previous owner had the paint sprayed right over them, and I think there must  have been some adverse reaction, because that paint peeled off, and the plastic was all cracked, letting dirt underneath them and turning them black. You can see in the title picture how bad they looked. Scraping them off wasn't too bad. I also pulled off the door guards, which are small triangular black plastic pads that are right in the middle of the door so that my door doesn't mess up other cars when the doors swing out. they just pull right off and are only held on with adhesive, which is a pain to scrape off.

Since I'm painting, I was a little aggressive scraping all the adhesive from these parts off. I just used a razor blade and cut through the factory paint down to primer, since I'm just going to strip it all. I feel bad for those doing these deletes and keeping their existing paint. I think there are a few posts on rennlist with advice on which types of solvent to use to get rid of the adhesive.

Spent today: 2 hours, $2.50
Spent total: 2 hours, $2.50